Animating Confetti in JavaScript: A Step-by-Step Guide


Hyperflexed stoled my mind, I simplified the same.
When I last created a video, I thought I should be consistent, but we all know promises are never kept.
I had this idea when I saw an awesome animation that wasn’t on YouTube. I was being lazy, and a few days later, Hyperplexed uploaded that video. I was like, damn.

Hyperflexed(500k)
Adarsh Gupta(0.4K)
I had a “eureka” moment after seeing a complex animation and thought, “I can simplify this.” The idea was to balance simplicity with functionality, a typical trade-off in coding, right?
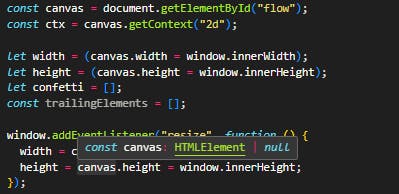
I began by creating a canvas element in HTML and setting its dimensions to cover the entire window. The resize event listener ensures the canvas adjusts its size when the window is resized.
I created a Confetto class to define each piece of confetti. Each confetto has properties like position, size, color, and velocity. To make the confetti look natural, I added randomness to its size and color, choosing between white and light pink.
class Confetto {
constructor(x, y, velocityX, velocityY) {
this.x = x;
this.y = y;
this.size = Math.random() * 10;
// color should be wither white or pink or purple
this.colors = ["white", "lightpink"];
this.color = this.colors[Math.floor(Math.random() * this.colors.length)];
this.velocityX = velocityX * 0.05;
this.velocityY = 1 + Math.random() + velocityY * 0.005;
this.gravity = 0.02;
this.drag = 0.97;
this.timeToLive = 2000; // 2000 milliseconds = 2 seconds
}
draw() {
ctx.fillStyle = this.color;
ctx.beginPath();
const spikes = 4;
const outerRadius = this.size;
const innerRadius = this.size / 2;
for (let i = 0; i < spikes * 2; i++) {
const radius = i % 2 === 0 ? outerRadius : innerRadius;
const angle = (i / spikes) * Math.PI;
const x = this.x + Math.cos(angle) * radius;
const y = this.y + Math.sin(angle) * radius;
ctx.lineTo(x, y);
}
ctx.closePath();
ctx.fill();
}
update(deltaTime) {
this.x += this.velocityX;
this.velocityX *= this.drag;
this.y += this.velocityY;
this.velocityY += this.gravity;
this.size = Math.max(
0,
this.size - (this.size * deltaTime) / this.timeToLive
);
}
}
Drawing the Confetti
The draw method of the Confetto class is where each piece of confetti is visually created. I opted for a simple shape with spikes, resembling a star. This method uses basic trigonometry to draw the shape.
Animating the Confetti:
In the update method, I applied physics to the confetti. This includes updating its position based on velocity, applying gravity, and reducing its size over time to make it disappear.
Tracking Mouse Movement:
I used an event listener for mousemove to trigger the addConfettoAndTrail function. This function calculates the mouse’s velocity and creates a new confetto at the mouse position with this velocity, adding a bit of randomness for a natural effect.
Creating a Trail Effect:
I also wanted a trailing effect behind the mouse. For this, I created a div element that follows the mouse cursor, and I limited the number of trailing elements on the screen to prevent overcrowding.
Finally, an update function was used to continuously redraw the canvas, updating and drawing each confetto, and filtering out the confetti that are no longer visible.
Follow this video for a detailed analysis:
If you want to build a SaaS in a day, check out this boilerplate:
[Launch Your Startup in Days, Not Weeks | ShipFast
The NextJS boilerplate with all the stuff you need to get your product in front of customers. From idea to production…shipfa.st](https://shipfa.st/?via=adarsh "shipfa.st/?via=adarsh")
Follow for more.✨